How to Easy Out a Stuck Screw
Rusted screws are annoying. Stubborn and sturdy, they're a belligerent bunch, and it's difficult to tempt them out of their long-time home. Got rusted screws on your home, car, bike, fixtures, furniture, or fittings? You've found an ally with us, and we'll help you to wheedle them out, quickly and easily.
In this guide, we've brought you lots of information on how to remove rusted screws. We've presented you with 3 simple step-by-step guides, along with lots of tips, help, and information.
Contents [ show ]
- How to Remove Rusted Screws
- Method One – The Simple Way
- Method Two – For Stripped Screws
- Method Three – Hot, Hot Heat
- How to Remove a Rusted Screw With No Head
- How to Prevent Screws From Getting Rusty
- Store Stuff Properly
- Keep Things Dry
- Oil Things Up
- Get Painting
- Final Words
How to Remove Rusted Screws
Method One – The Simple Way
For the vast majority of rusted screws, this method will work, no matter how firmly fixed they seem to be. Here's a step-by-step guide to the simplest, easiest way to remove rusted screws:
Step 1 – Hammering
Get a hammer, and carefully but forcefully hammer on and around the screw.
Over time, rust sort of becomes like glue, and fixes things together. If you hit the screw with a hammer, you can dramatically reduce this adhesion, helping to force the screw loose. Be careful during this stage, so you don't smash whatever the screw is fixed to.
Step 2 – Lubing
Now that you've formed some cracks in and around the rust, it's time to lube them up. Good old WD-40 (or something similar) will probably work, but you should consider investing in some stuff that's specifically designed for the job. Something like this CRC Screwloose Super Penetrant Oil is designed especially for rusty situations like yours.
Whatever lubricant you're using, spray some of it on and around your rusty screw, and leave it for a couple of minutes before hitting the screw with the hammer again. Then leave it for a further 20 minutes. Go and have a coffee or something – you deserve it.
If you don't have any good lubricant, any natural dissolving agent might be enough, so you can try stuff like lemon juice or cola. But a proper rust-battling penetrant is always best.
Step 3 – Start Screwing
You've had your coffee, and now it's time to return to your screw. Tap it gently a couple more times with your hammer, to give you an idea of whether or not you've sufficiently loosened things up. If it doesn't look very loose, do some more hammering and lubricating.
But if you're confident you can now get your rusty screw out, take a screwdriver and start trying to turn the screw. Go slow and gentle, as you don't want to pull the head off the screw.
If the ridge on the head of your screw has rusted over, use some form of dissolving agent. Consider lemon juice, hydrogen peroxide, or one of the products we've already discussed above – all of them can help to remove rust. Whichever product you go for, use some steel wool, too, which'll help you wipe away as much rust, dirt, and debris as you can.
If your screwdriver isn't working, you can try using a drill – but be warned, using a drill increases the chances you'll rip the head off the screw. If you want to reuse the screw, that could be a problem – but if you're mainly interested in removing the screw at all costs, then it's not an issue.
Make sure you wear safety goggles if you're using a drill – you don't want pieces of rust flying up into your eyes.
But what if none of this is working? And what if there's no ridge at all on the head of your screw? That brings us to method two…
Method Two – For Stripped Screws

Before we move on to this method, I know what you're thinking – "what's a stripped screw?"
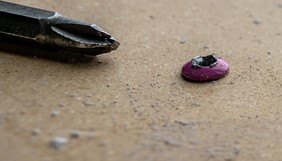
A stripped screw is a screw which has absolutely no head indents. If your screw has been rusting for years, or if the screw has been incorrectly used, then it's possible you've been left with a stripped screw. The weird-looking screw in the image above – that's a stripped screw.
If you have a stripped screw, you have two options. The first and simplest is to try using pliers, lubricant, and a dissolving agent to yank the screw out. If you're lucky, that method might work right away.
If you aren't lucky, you'll need to try this second (and more hardcore) option instead:
Step 1 – Cutting
Using a cutting tool, a rotary wheel, or something similar, cut a new head ridge into your old, rusty screw. This needs to be big, straight, and even enough to accommodate a screwdriver, which you can then use to get your screw out.
Step 2 – Revisit Method One
Now, you're ready to follow the steps we've already outlined in method one. You should now be able to turn your screw out, using the freshly-cut line you've just carved out yourself.
If this still isn't working, consider using some heat.
Method Three – Hot, Hot Heat
Look, this can be a dangerous option, but it's an option. Be sensible, and make sure you follow the instructions properly.
Step 1 – Prepare and Apply Some Heat
When fire is applied to metal in any significant way, that metal will expand. If you can make your screw expand, you'll maybe crack the rust fixed around the metal, which will give you more wiggle room to get the screw out.
First, you want to wipe the screw with a rag, to make sure there's nothing flammable on it. Next up, prepare some water and anything with a flame (a normal household lighter is okay, but something more powerful is usually better).
Heat the screw until it starts smoking, then immediately remove the heat before quickly throwing some water on the screw.
Step 2 – Repeat the Heat
If you're lucky, one cycle of heat and water might have loosened the screw sufficiently, but you'll probably find that you need to do a few cycles to really make this method work. With this method, it's the rapid switching between heat and cold that makes the area around the screw crack. Keep going until the screw seems to be significantly movable.
Step 3 – Revisit Method One
If the screw seems like it might start moving, revert to the beginning of method one, as outlined above. You should now be able to get the screw loose.
How to Remove a Rusted Screw With No Head
As we've already mentioned, you can use pliers to remove a screw with no head. If you use a patient combination of pulling and lubrication, or pulling and heat, you'll usually be able to use pliers to remove a rusted screw with no head.
But if pliers aren't working, you can also try similar approaches with cordless drills, chisels, and cutting tools. Basically, if you can create a divot around the screw or clamp onto the screw, you should be able to pull it out with enough heat or lubrication.
This video has some excellent guides and tips on removing screws with no heads. Follow the instructions while using added heat or added lubrication, to account for all the rust.
How to Prevent Screws From Getting Rusty

If you can stop your screws from getting rusty, you'll never need to remove rusty screws ever again. Here are some things you can do to prevent screws from getting rusty:
Store Stuff Properly
Screws get rusty because of exposure to moisture and air (which is how everything gets rusty).
If your screws are fixed to something you're able to store indoors (such as a bicycle or your trusty tools), store them indoors. Store them where there's little moisture and little humidity. If you can use a dehumidifier in your storage room, that's even better.
Keep Things Dry
If screws and their surroundings are dry, they're much less likely to rust. Frequently and routinely wipe down your fixtures, fittings, and outdoor areas, to prevent moisture from building up on and around screws.
Oil Things Up
If you regularly apply lubricant to your screws, such as WD-40, you'll massively slow down the rusting process.
Get Painting
If you paint over your screws, you're applying a barrier that will help to stop moisture, air, and water from getting in and around the screws. Some paints – like this POR-15 paint – are specifically crafted to prevent and deter rust.
Final Words
Hopefully you haven't screwed that up. And hopefully you're no longer screwing your face up. But most of all, hopefully you know some better screw puns than me.
The above guide should've given you all the hints, tips, and information you need for removing rusted screws. With the right tools and the right approach, removing rusted screws is often an easier job than you think. Need any more DIY help? Stick with us – we've got all the help, information, and how-to guides you need.
warnerbradoet1971.blogspot.com
Source: https://tooldigest.com/how-to-remove-rusted-screws/
0 Response to "How to Easy Out a Stuck Screw"
Post a Comment